Eliminating Contamination in CO2 Incubators Through Effective Cleaning
Can you eliminate your contamination?
In the ideal laboratory setting, transferring cell growth samples in and out of incubators would be done without concern about contamination and its potential effect on samples. But until environmental control equipment creates this perfect environment, monitoring contamination and ensuring a clean test environment is critical.
There are two ways to accomplish this:
- Select an incubator, preferably a CO2 incubator, that has design features that will help to keep contamination at an almost nonexistent level.
- Follow a cleaning procedure that is thorough and performed on a regular basis.
Cleaning is particularly important because it can mean the difference between a high-quality, reliable analysis and one that is faulty. Anyone working in a laboratory environment using this kind of equipment wants to avoid inaccurate scientific conclusions. Fortunately, with the development of CO2 incubators, there is a cleaner and safer testing environment within the incubator itself. This has helped keep contamination in check for the most part. although incubator disassembly and cleaning is still critical. Technicians, scientists, or researchers using CO2 incubators are growing or sustaining mammalian cells. Any application will require time for testing and study. CO2 incubators are intended for long-term tissue and cell culture applications. Their advanced design controls contamination.
Why are CO2 incubators an important consideration in conjunction with cell culture analysis?
A CO2 incubator operates on fairly simple parameters based on three elements: carbon dioxide (CO2), temperature, and relative humidity (RH). A scientist using a CO2 incubator is trying to reproduce the mammalian environment (in vivo) outside of its natural state (in vitro). Therefore, the incubator combines three elements that create an environment needed for cells to thrive by establishing a balanced and controlled pH at 7.2-7.4: stable temperature at 37 °C, high RH at 95%, and controlled CO2 level at 5%.
CO2 incubators have become acceptable, reliable equipment given the growth in cell culture research and the ability of incubators to grow cells in vitro. But on the flip side of this benefit is the constant threat of contamination to the cell culture environment. Therefore, it will be helpful to look at the different types of CO2 incubators available to laboratory personnel, what kinds of contamination they each can produce, and the proper regimen to follow for cleaning these incubators to decontaminate them as effectively as possible.
CO2 Water-jacketed Incubators
Water-jacketed incubators are designed and used primarily for in vitro incubation of valuable cells, tissues, and organisms. The water jacket envelops the incubator chamber or cabinet providing excellent insulation while eliminating prime targets of condensation. The result is that the water-jacketed incubator reduces cold spots, virtually eliminating condensation so contamination is less likely to occur. Like its counterpart, the air-jacketed incubator typically has temperature control settings (main chamber, external door, and front liner) to minimize condensation and yield precise temperature uniformity. It is a matter of personal choice for the user whether or not to choose a water jacketed or air-jacketed incubator. Both styles can provide chamber features that provide uniform temperature control, reduce condensation, and safeguard them from contamination.
Copper Fights Contamination
Some CO2 incubators incorporate copper in their cabinet design to deter contamination. As the copper breaks down, it releases copper oxide, which destroys microbes present in the chamber. Sheldon Manufacturing, Inc. (Cornelius, OR), produces incubators that feature a copper housing around a HEPA (high efficiency particulate air) filtration system filter inside the cabinet. This copper housing is patented and helps to eliminate contamination where it strikes hardest-in the chamber atmosphere. Also, replacement of the filter is easy and inexpensive. Copper is also used inside the water jacket to eliminate contamination growth over time inside the jacket. No chemicals are recommended or needed in the water jacket. Copper is also used around the sample port and the gas injection tube.
Numerous Contamination Sources
Humidified CO2 incubators, by their very nature, are a haven for contamination since they create an environment for the support and growth of bacteria, mold, and spores. While it may seem conflicting to have an incubator that is designed for cell culture study yet can create a decontaminated environment at the same time, the solution is to keep the chamber and all of it parts clean. One main source of contamination in humidified incubators is the humidity pan itself, an easy part to forget to clean unless the user is about to replace the water that has evaporated. Unless this is cleaned regularly, mold, bacteria, and yeast can settle in comfortably. It is also key to clean the humidity pan to maintain a constant humidity level since the humidified environment occurs only when water from the pan evaporates. The surface tension of the water is needed for a constant environment; otherwise, contamination can occur.
Contamination can develop in plastic tubing leading into the chamber, as well as in rubber gaskets that encase the incubator’s opening where mold can develop. It is important to clean out the threads or tracks of the gaskets. Sheldon’s incubators feature autoclavable and removal gaskets for easy cleaning and changing. Other trouble spots where contamination can settle include shelves, seams, and electrical cord ports that need to be part of a routine cleaning regimen.
No Substitute for Cleaning
As emphasized earlier, cleaning the CO2 incubator is essential, particularly for the researcher dealing with tissue culture applications. It is the only way to truly prevent contamination, and it is the best way to reliably grow cells in culture. A typical decontamination procedure that is adequate for most CO2 incubators includes:
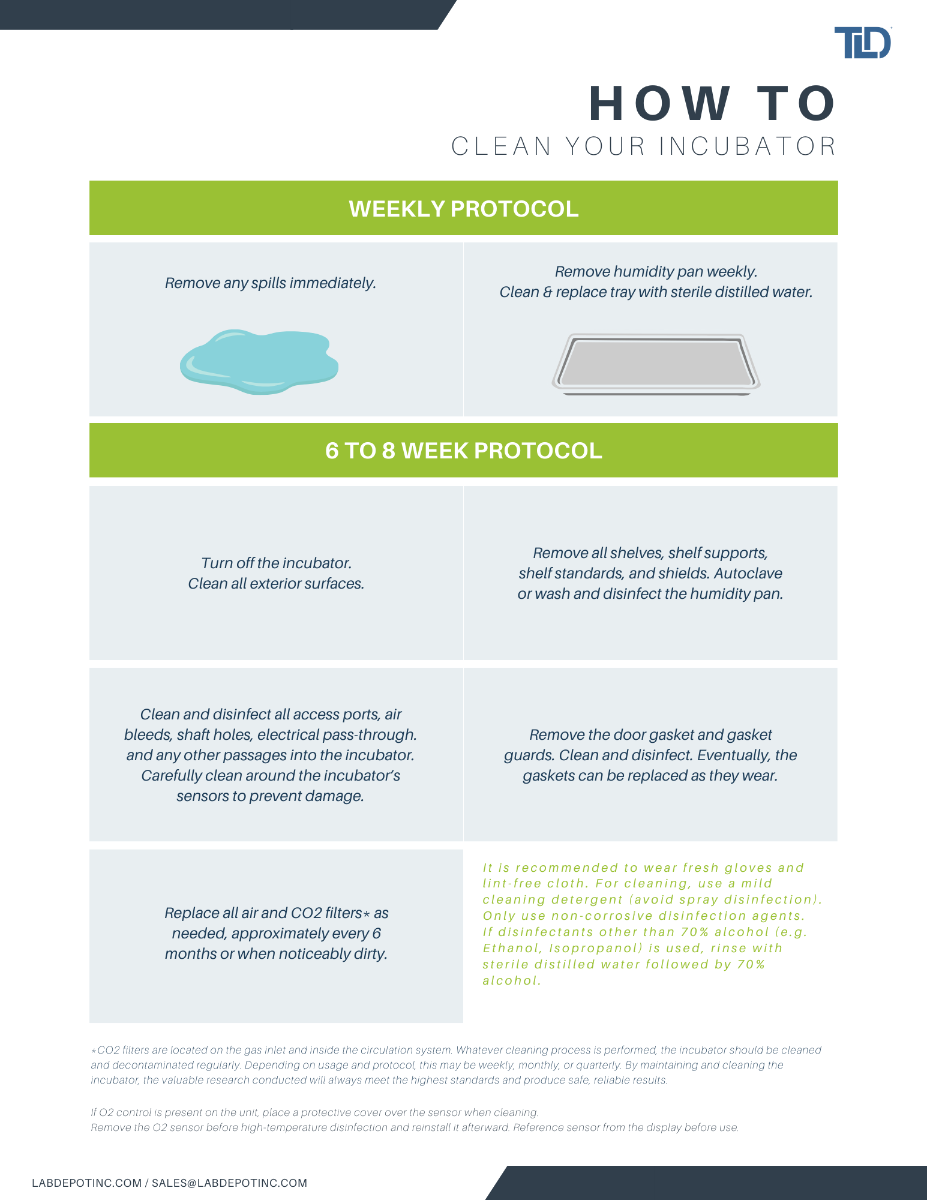
- Remove the humidity pan weekly and autoclave all stainless steel parts. Wash with soap and water and allow to dry. Use a disinfectant as appropriate for the application. Replace the pan in the incubator with fresh distilled water.
- Remove all shelves, shelf supports, shelf standards, and shields. Autoclave or wash and disinfect as described above for the humidity pan.
- Wipe down the chamber with soap and water. Allow to dry. Use disinfectant as appropriate for the application. Let dry.
- Clean and disinfect all access ports, air bleeds, shaft holes, electrical pass-through. and any other passages into the incubator. Carefully clean around the incubator’s sensors to prevent damage.
- Remove the door gasket and gasket guards. Clean and disinfect. Eventually, the gaskets can be replaced as they wear.
- Replace all air and CO2 filters as needed, approximately every six months or when noticeably dirty.
CO2 filters are located on the gas inlet and inside on the circulation system. Whatever cleaning process is performed, the incubator should be cleaned and decontaminated regularly. Depending on usage and protocol, this may be weekly, monthly, or quarterly. By maintaining and cleaning the incubator, the valuable research conducted will always meet the highest standards and produce safe, reliable results.
Download the Cleaning and Maintaining Your Incubator Guide provided by The Lab Depot.
Sources:
Information provided by Shel Lab
Related Products
-
![KIMWIPES™ Delicate Task Wipes]()
-
![Water, Distilled, Reagent Grade]()
-
![CO2 Air Jacketed Incubators]() CO2 Air Jacketed Incubators
CO2 Air Jacketed IncubatorsStarting at from $7,913.69 Sale $7,518.00
-
![High Heat Auto Decontamination CO2 Incubator]() High Heat Auto Decontamination CO2 Incubator
High Heat Auto Decontamination CO2 IncubatorStarting at from $9,142.59 Sale $8,685.46
-
![Large Capacity CO2 Air Jacketed Incubators, Infrared (IR) Sensor]() Large Capacity CO2 Air Jacketed Incubators, Infrared (IR) Sensor
Large Capacity CO2 Air Jacketed Incubators, Infrared (IR) SensorStarting at from $18,006.57 Sale $17,106.24
-
![CO2 Water Jacketed Incubators]() CO2 Water Jacketed Incubators
CO2 Water Jacketed IncubatorsStarting at from $6,300.90 Sale $5,985.86
-
![General Purpose Digital Laboratory Incubators]() General Purpose Digital Laboratory Incubators
General Purpose Digital Laboratory IncubatorsStarting at from $2,875.16 Sale $2,731.41
-
![Peltier B.O.D. Thermoelectric Cooled Incubators]() Peltier B.O.D. Thermoelectric Cooled Incubators
Peltier B.O.D. Thermoelectric Cooled IncubatorsStarting at from $4,106.03 Sale $3,900.73